Dry oranges for decoration in the oven. Three effective methods for creating decorative blanks from orange slices
Natural materials are often used in New Year's and Christmas decorations - wood, spices, dried oranges, lemons, apples, pears. It is dried citrus fruits, cinnamon, star anise and the smell of pine needles that create the scent of Christmas and New Year in our homes. After all new Year decoration suggest not only sparkle and lights, but also comfort, warmth and aroma of handmade New Year decorations and gifts.
How to dry oranges in slices or whole, how to dry oranges quickly or slowly, in the oven, without an oven or in the microwave, on a battery or without bothering at all. How to make dried oranges for decoration and get amazing material for festive creativity.
I will show you 6 ways to dry citrus fruits as well as how to dry whole oranges.
1. Dried oranges for home decoration
Many decorate their homes on the eve of the New Year. Filled with beauty and aromas. Many people associate the smell of oranges with the New Year and Christmas. Let's combine our feelings and try to make decorations from dried oranges, which, when proper storage can last for many years.
You can dry not only oranges, but also any citrus fruits. And when you get slices of lemon, grapefruit, and any of the citrus fruits, you will have decorations of different colors and shapes. So don't stop at just dried oranges.

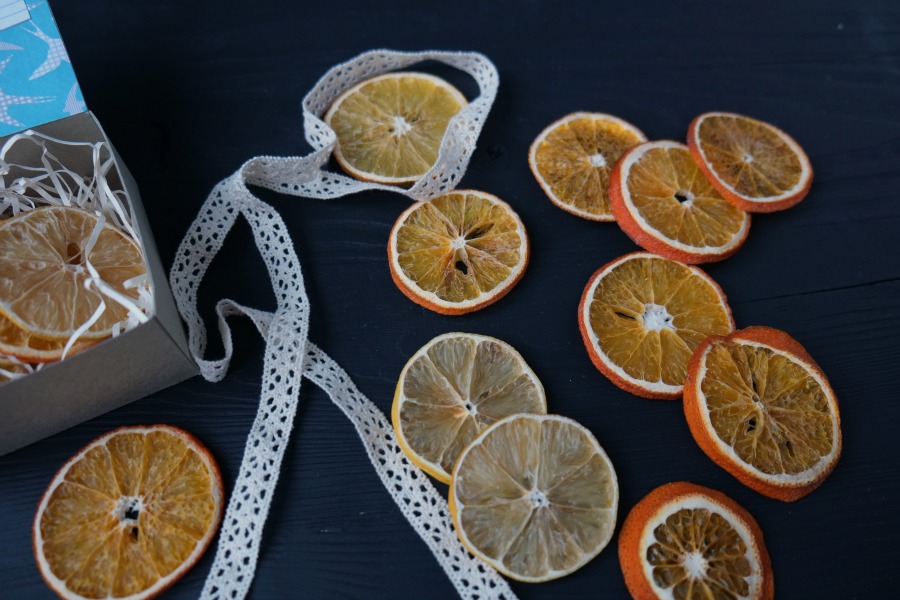
1.1. How to dry orange slices: 6 ways
I myself dry the citrus slices without bothering at all. After all, I do not need a huge amount of material, and I am not going to use them on an industrial scale. I use method 1.1.3 this on a heating radiator, just on top.

And this is my favorite way, but I did not come to it right away, because I was worried that I would do something wrong, I thought that there were some cunning and proven ways to create perfect dried orange slices, the secret of which is kept behind seven locks. This, of course, is all nonsense, so I'll tell you about all that I have experienced, but the only true one still does not exist. Do as you like, as it is convenient and pleasant for you.
Cut to dry citrus fruit into slices across, horizontally. This is necessary so that the drawing of the pulp is equally beautiful for all dried slices. The thickness of the slices should be approximately 3-4 millimeters. Cutting thicker will make the orange slice take longer to dry or rot altogether. And if it is thinner, it can be deformed during cutting and drying. So the question of the thickness of the lobule is actually very important. 
1.1.1. In the oven - quick way -1.5 hours
Place the slices on a baking sheet on baking paper. Or on a wire rack and on paper. Preheat the oven to 150 degrees. It is necessary to use the convection mode. This is forced air circulation in the oven. On modern ovens, there is usually. It's just a fan in the oven itself. We keep the slices for 15 minutes, then turn them over and keep them for another 15 minutes. Then we lower the temperature to 70 degrees and wait another hour. In total, it turned out 1.5 hours.

1.1.2. In the oven - slow method - leave overnight
We also spread it on baking paper, but in this case it is better on the wire rack itself, and not on a baking sheet. Set the temperature to 70 and leave it overnight. In the morning we get perfectly dry, perfectly dried oranges. 
1.1.3. On top of the battery
This is my favorite way. I just put the circles on the same baking paper. From time to time I go up, admire and turn over. And at the same time I level it. The circles tend to curl, or bend the edge. I just press my palm on the circle and that's it. Only this should be done on the first day, while they are still wet. Once dry, they become brittle, especially at the very edges of the crust. ![]()
1.1.4. On the battery inside
This method is not for the lazy. I found a video here specifically for the most hardworking. Props are needed here:
- Corrugated cardboard
- Any perforating tool
- Paper clips or clips
And the result is basically the same. But there is a very pleasant moment in this method. This is when you open this structure in a couple of days, and there are perfectly even dry slices. And the cardboard also smells a little orange.
And be sure to blot the cut orange with a napkin. So as not to rot there inside unattended.
1.1.5. On air
After cutting, you need to plant orange slices on wooden skewers or string them on a thread and hang them in the kitchen. So Christmas decorations hang for about a week. The smell in the kitchen is excellent and the mood is New Year's Eve. If it's a pity to let a few fruits go for drying, you can do it periodically, several slices at a time. This method has a peculiarity - when drying in a suspended state, orange slices come in various shapes, not flat. Sometimes this adds a special charm to the jewelry.
1.1.6. In the microwave - an extreme way
This way is for the brave. Let me explain why. No matter how you cut into 3 mm or 2 or 4, the fruits are all different and there will be no ready-made absolutely accurate time recommendations. Even if you start with 10 seconds and be very careful.
But one has only to overexpose, as a slice of lemon or orange flares up like a torch. I experienced it. I cannot say that these are very positive emotions. Here in the photo I can show an instantly burnt lemon circle.
 I do not recommend drying oranges in the microwave
 And the physics of this process is as follows. If the juice slowly evaporates on the battery or in the oven, then in the microwave it simply flows out of the fruit. And you need to drain it, and put it in the microwave again and turn it on for the next 10 seconds.
For me, it ended with the fact that I still dried one slice, but dried it all the same on the battery, so the process is more controlled.
- Cut into 3mm thick.
- The juice is sweet and the mugs will stick to the paper. Do not be alarmed, you can gently peel off with your hands or something sharp
- Once dry, the mugs become very brittle and must be handled with care.
- To get slices like from the cold, you need not sugar, but gelatin. I usually dry on a battery on a battery. If dried in the oven, the temperature should not be higher than 70 degrees.

2. Dried oranges for decoration with slices - use cases
As with any creative process, the process of drying oranges can be so addicting that it will be difficult to stop (until the oranges run out). So I'll take the liberty of suggesting use cases.
2.1. Dried orange wedges in tea are good too
Dry slices in jars look very nice, and from time to time it is nice to take a slice from there and put it in tea. In addition, it can be used to make mulled wine or any warming aromatic drinks.

2.2. Dried oranges in circles in the decor
Decorations for the Christmas tree, under the Christmas tree, we use for decoration New Year's packages gifts for composing compositions.
3. Whole dried oranges for decoration
Dried whole oranges or tangerines or small lemons look incredibly attractive.

3.1. How to dry whole oranges
The method turned out to be simple. We cut an orange with a sharp sharp knife from top to bottom, leaving the top and bottom not cut, which is logical. The fruit should not fall apart.
And just put it on the battery to dry. Observe as it dries, turn over. The incisions should open, as it were, but sometimes they "grow together". Don't let them do it, renew the cuts, the juice evaporates through them. Over time, the incisions will become wider and the crust will become hard and dry. I dry small dry fruits, these dry for almost a week on my battery.

I would not advise using the oven when drying whole oranges, as they dry on top faster than the core and inside the fruit can then rot
4. How to beautifully dry oranges
I always want to make it prettier, more perfect and more perfect.

4.1. Compare the methods of drying lemon and orange slices
- The color of the slices will be lighter, more natural when dried on a battery in an open way
- The color of dried fruits in the oven will be darker, not because they are "fried", but simply when they are dried in the oven, the fruit will give off more moisture.
- By the way, over time, all slices dried in any way will darken, all for the same reason, they will give back even more moisture. And naturally, they will become more fragile.
- If oranges are blotted heavily before drying, the pattern of orange or lemon cells will appear blurry, but in general this is visible only in direct comparison.
- When drying between cardboard boxes, the slices will be perfectly even, and when air dried in the form of garlands, they will have an uneven surface.
Dry oranges for decoration, dried in any of these ways, are an amazing material for festive New Year's creativity.
It is now very popular to decorate a room using exclusively environmentally friendly materials.
Dried citrus fruits, including lemons, may well serve as such a material for decoration.
Choosing the right lemons
Before proceeding directly with the process, you need to understand which lemons are suitable for this. The fruit should be firm and ripe. It is necessary to carefully examine the skin so that there are no flaws on it. 
The shape of the fruit must be correct, without humps and bulges. Small fruits will not work. They usually have a very thin skin that can burst when cut. They also have a lot of juice, which will make them dry longer. The lemon that works best should be medium in size, with a thick skin and a dry center. When cutting, juice should not flow out of it. But these fruits are usually very large and difficult to find on sale.
Important! If the lemon has a good skin color but is soft, you shouldn't take it. Perhaps the process of decay of the pulp has already begun inside. It will taste bitter and have an unpleasant odor.
Therefore, the usual beautiful, ripe fruit is also fine. If you come across a pale orange lemon, you can safely take it. This will make a great mix. 
Citrus preparation
Before drying, the fruits must be prepared. First of all, they need to be washed and allowed to dry. Next, the citruses are cut into width using a knife. The thickness of the slices depends on what you want to end up with.
If you cut it very thinly, then during drying, the slice can break and bend. If the slices are thick, then they will dry much longer, and after drying, they may not have a very aesthetic appearance with a concave center.
The optimal thickness of the slices should be at least 5 mm, and no more than 1.5 cm. In this case, you can use the rule of the golden mean. You can try drying a whole lemon as well. To do this, its skin is cut vertically into strips up to a centimeter wide.
Did you know? In order to prepare a liter of essential oil, you need the peel of three thousand lemons.
When the slices are ready, excess moisture needs to be removed from them. This can be done with napkins or towels. The pulp of each circle is squeezed with your fingers and the juice is gently squeezed out. In this case, it is necessary not to damage the integrity of the walls, otherwise finished product there will be an unattractive presentation. 
Drying methods
There are several drying methods. Therefore, before you dry a lemon for decoration, you need to understand how quickly you need to do it.
The fastest way to do this is in an oven or electric dryer; it will take longer to dry naturally. Therefore, we will consider each of them in more detail.
In the oven
The fruit can be dried faster in the oven. For the process itself, you will need a baking sheet or wire rack, parchment paper or foil.
Before you dry a lemon for decoration in the oven, you need to decide on the number of slices that you need.
Those who have done this before are advised to put only one baking sheet with the product in the oven.  But, if desired, you can place both a baking sheet and a wire rack.
- The baking tray must be washed well. There should be no other products left on it, which can subsequently give the lemon unpleasant odors. Then dry it completely or wipe it. There should be no water residues on it. The baking sheet is covered with parchment or foil, this is done so that the slices do not stick to it.
- Both together with the baking sheet, and separately, you can use the wire rack. According to experts, the process is faster on it. It is also cleaned of dirt residues and covered with parchment paper.
- Place the lemon wedges on a baking sheet or wire shelf in the order you like. The main condition is that they should not touch each other.
- The oven is heated to 50 ° C and a baking sheet is placed there. It should be located in the middle of the instrument. You can place up to two trays, but this is not recommended.
- Temperature oven can be from 60 ° C to 180 ° C. At low temperatures, the lemon seems to dry out, the shape of the lobule will remain unchanged, but the process will be very slow in time. At high temperatures, there is a possibility that the slices will burn, they may bend, but this will take much less time.
- The drying time in the oven, depending on its type, the selected temperature and the width of the wedge, can be from 2 to 8 hours.
- During the drying process, the lemon slices should be turned over from time to time. This will allow them to dry at the same time and prevent them from burning.
- You can only take it out when the pulp and skin are completely dry. If all the moisture does not go away during drying, the decor items may subsequently become moldy.

In an electric dryer
It is now very popular to decorate a room using exclusively environmentally friendly materials.
Dried citrus fruits, including lemons, may well serve as such a material for decoration.
We will learn how to dry them properly, what methods have been invented for this.
If you have a fruit and vegetable dryer, it will work just fine for a lemon.
- Prepared circles, namely without excess moisture, are placed on its grates. In this case, the number of gratings does not play a role, since due to the air circulation, the process goes evenly.
- It is important that the slices do not touch each other.
- After that, according to the operating instructions for the device, the appropriate mode is selected and the process of making lemon decor begins. Depending on the drying power, lemons dry after 6-8 hours.

Behind the battery
Drying citrus for decoration in a battery is the most budgetary way. Gas and electricity savings are evident, and the fruit dries naturally. It's better if you have old batteries rather than modern radiators.
Important!If you forget or haven't removed the excess moisture from the slices, they may become moldy.
In them, the process will go faster and better, and more slices can be prepared.
- You will need two pieces of corrugated board to dry. In size, they should be such that they fit between its sections, namely, about 30 cm in length and one third less in width.
- In the pieces, using any tool, you need to make many through holes at a distance of one from one to a centimeter. Air will circulate through them.
- Next, citrus slices are laid on one sheet and tightly covered with another. It is necessary that the lemon is tightly pressed against the cardboard on both sides, so the sheets can be fastened with clamps or rolled up with a rope. The slices inside should not "fidget".
- After that, the "lemon sandwich" is placed between the battery compartments. If they are narrow, then you can dry the bundle at the top, but at the same time it must be turned over periodically. Depending on the temperature of the radiators and air humidity, drying lemon for decoration in a battery lasts from three days to a week.

The process of drying lemon for decoration is quite simple, but somewhat useful tips will not be superfluous.
Bright citrus fruits - oranges, lemons, grapefruits, tangerines - are always associated with the sun and joyful mood. They can be useful not only as food, but also in the role holiday decorations for home and gifts.
You just need to choose a way to dry oranges for decoration, as well as other citrus fruits, and use the cooked fruits as your imagination dictates.
Fruit preparation
To decorate a house for the holiday, you do not have to spend money on decor items: you can easily make them yourself. Lovely DIY jewelry is obtained from citrus fruits. You just need to choose the right fruits and dry them correctly.
Not every fruit is suitable for drying: immature can lose his bright color, and overripe, on the contrary, darkens. Therefore, it is better to choose citruses of medium ripeness. The size depends on the intended craft: for example, small fruits are suitable for a gift box or postcard, and larger for Christmas tree decorations.
Before you dry the fruit, you need to wash it well, wipe it dry and cut it into slices of the desired thickness. The optimum will be 0.5-0.7 cm. After that, they need to be laid out on napkins so that excess juice is absorbed.
Methods for drying citrus fruits
There are several ways to dry orange circles, which differ only in the time spent. The result will be equally good.
In addition, the instructions on how to dry an orange for decoration in the oven are also suitable for other fruits.


To dry decorative orange slices in the microwave, you will need a dish made of refractory material and parchment for baking. Sliced citrus rings are laid out on a dish lined with paper and sent to the microwave on medium power, making sets of 30 seconds until the slices are sufficiently dry.
To dry orange slices for decoration in a frying pan, cover it with baking paper, lay out citrus rings and put on a small fire. It is necessary to periodically turn the slices so that they do not burn.
 Owners of an electric dryer do not have to think about how to dry lemon for decoration, orange and other citrus fruits. The slices are simply laid out on its shelves and left overnight or for a day, depending on the power of the apparatus. The result is beautiful, evenly dried circles that retain their natural bright color.
To dry the decorative elements on the battery, you will need a sheet of cardboard and an awl to make small holes in it at the same distance from each other. This is necessary for the air to circulate. Citrus rings are laid out on one half of the prepared cardboard, covered with the other half and placed between the batteries, or placed on top. The slices will dry for about three days., you just need to turn them over from time to time. It is better if, after drying, they still lie in the open air.

If the weather is sunny You can dry the orange for outdoor decor, it is enough just to take out the dish with slices laid out on it on the balcony or in the yard (for owners of private houses). Depending on the weather, they will dry for about three days.
Craft ideas
Dried wedges citrus fruits are an excellent base for various crafts. They are mainly used for New Year's decor.
I have long wanted to dry oranges for decoration and finally tried it. You are reading the second edition of this article - the blank I wrote before I saw the result was as rainbow as a unicorn's mane. But something went wrong. At the end of the article, I have collected tips from blog readers. Hope you find them helpful.
A colleague at work has a fruit tree. It consists of whole dried grapefruit, orange and tangerine. After my experience with drying oranges, I cannot figure out how these fruits dried, rotted, moldy and started giving off intimidating odors.
I take citrus fruits more than calmly, therefore, without regretting a bit, I donated several oranges and one lemon for drying. Before starting to torture fruits, I read a dozen articles on how to dry oranges, and I found out that there are several ways.
1.In the oven. But why use an oven, especially since I have it electric, if there is a quite budget option.
2. Behind the battery. They promised a bonus in the form of a wonderful aroma, which should fill the room while the oranges are drying.
Before something went wrong
1. I took 4 oranges, 1 lemon, 2 large cartons, strong thread, scissors and a knife. I washed the oranges and lemon and cut them into slices about 3 mm thick.

2. She took out sheets of cardboard and made a lot of rather large holes in them with a knife for ventilation.

3. Put the oranges on one of the cartons and covered the second on top.

4. Tightly wrapped the structure with strong threads and sent it over the battery.

All articles on how to dry oranges promised results in three to four days.
And so something went wrong
Four days later, ready to see the evenly dried and colorless mugs, I decided to disassemble the cardboard construction. But instead of joy from the result, I was in for a complete disappointment. Almost all of the oranges remained the same juicy, and 30% were covered with mold.
Having removed the lost, bad-smelling comrades, I left the rest of the fruit to dry on the windowsill. Two weeks passed, but only four mugs were completely dry. What is the matter, I cannot understand. The room is ventilated and not damp, oranges and lemons are sliced thinly. It remains to blame genetic modification.
Ten times I regretted not using the oven and decided that I would buy a new portion of citrus fruits and dry it there at all costs. It is good that I consulted with my mother, who has rich experience in the preparation of dried fruits and dried berries. She said that it took her several days to dry quality pieces in the oven, but not several hours. I'm not ready for several days, even with interruptions, to use electric oven... Apparently I will dry oranges all summer in the country on a rope, like mushrooms.
In general, dried oranges are good for decoration. Such circles can be used in gift wrapping, as a filler in a vase or as Christmas tree decorations a la naturel... I hope mine will be dry by the New Year :).


How to dry oranges for decoration - blog readers experience
- Electric drying. You can dry berries, fruits, mushrooms, herbs in it. The apple slices take 8 hours to dry. Electricity consumption is not large at all. It can take up to 10 hours for oranges.
- Convection oven. Oranges dry in an hour at 100 degrees. If the slices are not very thin, then about 2 hours.
- Dry in the oven periodically. After something is baked, you can put a cardboard box with oranges in the heated oven. Make the holes in the cardboard bigger, the batteries hotter.
- Pierce the orange circles in several places to stack the juice.
- Blot slices with a paper towel.
Have you tried drying oranges? Have you had a tough experience in preparing something?