Crafts from salt dough for children.
Our distant ancestors decorated with figure pictures of spikelets, berries, the leaves of the Karavaev surface before baking to attract good luck and get a blessing from their deities. Today we do it without any religious background, just for beauty.
In addition to decorating edible products, the use of a special composition test allows you to create very spectacular and beautiful ornamental figures, pictures and flowers. In this case, the dough perfectly replaces more complex and expensive materials, so ideal for young children. But this is such an exciting occupation that adults solid people are happy with pleasure.
It is all important to use salt dough for self-expression and relaxation, it is only important to know how to make a durable and plastic material, and also competently dry and paint the finished product.
Subtleties of cooking dough for crafts
The modeling of products itself does not differ from working with plasticine or other similar materials. The advantage of salt dough is that it is more plastic, less dirty hands and surrounding items, gives more opportunities for the implementation of complex works, and also preserved perfectly after proper drying, becoming solid and durable.
- The complexity is how to prepare the right dough that will not stick to the hands and tools, will not crack and crumble. To do this, use several simple advice:
- Do not take pancake flour - it is more sticky and dough will get bad consistency.
- Use only a small salt of the Extra type. A large salt will create a coarse scattering dough because of grains when kneading directly in dry form, and the dissolution of such salt in water will be too long in time. In addition, the stone salt can be impurities that blur the dough for modeling, and the "extra" salt is peeled and very small.
Running the flour with ice water, you can get a great, plastic and very homogeneous dough.
Taking advantage of these simple advice, you can start working with your children, creating a variety of amazing beauty products. Salted dough is simple, inexpensive and very affordable material for creativity, and children are simply crazy about such useful entertainment.

Used tools and materials used
When we sculpt from salt dough, we need special tools for work. All of them are in our homes, in kitchens or among stationery, sewing materials and needlework.
Basic tools and materials for work:
- Rolling pin for dough roll. If it is not or existing too large for children's hands, you can find a replacement in the form of a conventional glass bottle.
- Knife for cutting dough. Children can give a plastic knife from a set of color plasticine.
- Board for rolling the test and manufacture of products.
- Coloring paints (watercolor, acrylic, gouache - any water soluble dyes).
- Varnishes for decoration (water-based basis, best in aerosols). Additionally, you can use varnish sprays "with special effects" - "snow", with sparkles, gold, silver or other metallized varnish.
- A set of brushes for coloring.
- Water container.
- Forms for cookies.
- Diverse items to impart the texture of the finished product are toothbrushes, comb, knitting needles, buttons, lace and much more.
For young children, it is worth providing special clothing, as they can be strongly stained. Follow before working in a pack of dry and wet napkins - they are convenient not only to clean your hands, but also get into the brushes from the excess amount of paint. So it will be possible to avoid spreading dyes on the finished thing.

Three best recipes
To knead the salt dough, you can use your own hands or entrust this process of modern techniques - mixer or test mixer. With their help, you can get a particularly smooth and elastic dough.
In order for the finished product to not crumble, it is necessary to pre-pour the required volume of water to the salt, and then thoroughly mix with flour. It is important to wash the product well to full homogeneity, otherwise when dried, the finished thing can crack or get enough on separate pieces.
Basic recipe:
- A glass of flour (wheat or rye).
- A glass of small grinding salts of the Extra type.
- Half glass of ice water.
Mix the ingredients and knead the dough before smoothness. This recipe is great for products with thin details: to create colors, leaves, ornamental plants, and so on.
Plastic soft dough recipe:
- Flour is one glass.
- Salt small - one glass.
- Water is very cold - half a cup.
- Vegetable oil - 2 tablespoons.
Instead of oil, you can take glycerin, freshly fat cream or culinary fat. The introduction of fats or oils into the pick-up recipe allows you to make it a consistency of more plastic and elastic, and also avoid cracking the product after drying. This option is particularly suitable for "thick-walled" products that can split if the dough is completely dry.
For work with subtle details or multiple elements, you will need to use an improved salted dough recipe:
- 1.5 cups of flour.
- 1 glass of salt.
- 0.5 glasses of water.
- 2 - 3 tablespoons of PVA glue, glue for Metilan type wallpapers or any other water-soluble glue.
Such a dough perfectly holds a shape, you can make small thin elements from it, and with definitely "stuffed" hands you can do things outwardly indistinguishable from a good porcelain.
Any pick-up recipe can be regarded as a basis, since it is possible to modify it "for itself" in infinitely, experimenting with various ingredients until the proper composition is obtained.

How perfectly dried salted dough
The main complexity for beginners is the technology for drying the finished product. Perform drying in different ways:
- "Bake" in a heated oven as ordinary cookies, at a temperature ranging from 50 to 80 degrees (depends on the size and thickness of the product). The finished thing is put on parchment paper for baking and placed in a preheated oven for about an hour. The duration of processing depends on the dimensions of the product. Until the overall cooling of the oven, the thing from it is not taken out.
- Drying in a cold oven, that is, the product is put in a cold oven, turn on the heating and bring to the desired temperature. Everything else is exactly the same as in the previous paragraph.
- Products from the dough with salt is best just dried in the air, even though it takes a lot of time. Well dried handicraft becomes durable, solid and not exposed to external influence. The usual drying is perfect for small things or products from thin parts.
Cannot be used for drying electrical appliances or central heating battery. They dry the dough unevenly, which can cause cracking or damage, if it dried only on one side, has a dry surface and "raw inside".
Used dyes and finishing materials
When preparing a salt dough, the dye can be introduced directly to the product itself and get the material very similar to plasticine. But difficulty in this case will work with the material - you will have to connect separate colored parts, and for kids it is too difficult. Everyone loves to work with paints, so for children it is preferable to use the painting of the finished one-photon mans.
It is easiest to use paints soluble in water soluble in water. The acrylic dyes are very good - they give a dense and uniform color, have a large color palette and easy to use, dry quickly. But you can use the usual watercolor. It gives an excellent translucent layer, and paints can be hushed by lescing to obtain special effects - volume, tone transition, overflow and acquiring various textures. If there is a need to obtain opaque staining with watercolor, you can use the white primer. In its role there can be white acrylic paint, gouache or temperatures with the addition of PVA glue for hold on the surface of the product.
For decoration, you can use bulk paints, metallized dyes, beads of different sizes and shapes, buttons, rhinestones, and other little things that do not spoil from high temperature if drying is planned in the oven.
Is it worth covering a varnish
In principle, the finished handicraft from the salt dough holds very well paint, but if it is planned to use this thing, for example, for games, or it is a chess figure, a decorative vase, a box, a word, a thing that will suffer from constant touch, it is worth covering it varnish. It will not only protect the finished products from external influences, but also give a beautiful glossy gloss, which is necessary for many types of crafts.
The easiest way to use varnish in aerosols, conducting handling outdoors or in a well-ventilated room. If necessary, the coating of varnish can be repeated several times, while drying each previous layer. To give special decorativeness, special sprays can be used, for example, with the effect of snow or with sparkles.

Types of salty test products
For kids or beginners, it is necessary to use simpler forms and objects understandable. You can start sculpt from traditional cats or dogs, fruits and berries, machines and other simple figures without numerous and complex parts. Gradually, with an increase in the level of skill and the young sculptors themselves, it is possible to complicate, moving to the creation of figures, paintings and compositions.
The vertex of mastery can be considered to create colors from biocheramics, as elsewhere called salted dough. Of course, the simple chamomile can make a baby, but a full-fledged rose bouquet or a flake branch of jasmine can be done only by the "advanced" user.
To learn how to work with a salt dough, you need to follow the instructions step by step and do not rush to take for complex products.
Diverse panels and paintings from dough with salt
Create paintings from the test is not as difficult as it seems. In the first stages of creativity, it is worth using the tip in the form of a photograph of the future "works of art". For example, you want to create a beautiful autumn landscape. Find a beautiful photo with a small number of small details and use it to get inspiration.
- As a basis for the picture, a piece of fine plywood is suitable, but when it can be used with a dense cardboard. On the base of the base is superimposed with a dough layer. It can be glued with any suitable glue.
- All details of the future pattern are cut or shaved out of salt dough and are superimposed on each other as the picture is removed from the background. That is the most remote items from the viewer will be based on the first. This method will allow to obtain very accurate and expressive volumetric images.
- The finished picture is carefully dried, and then paint with suitable paints. After drying the paints, the picture is covered with varnish and placed in the frame. The product is ready, you can hang it on the wall in the room or give someone who can estimate the creative approach and talent of the artist.
If you use the foil and painted part as the basis for the product, it can be easily removed from it and then transfer to any other material. It can be a dense fabric stretched on a frame, glass, plastic, even metal. Such flat and at the same time bulk products can be decorated with boxes, decorate children's furniture, boxes with various things, or used to identify, for example, lockers for things in the dressing room of a kindergarten.


Figures and dolls from biocheramic
For kids, there is nothing more interesting than to sculpt "men." They really like "cartoon" heroes, for example, fixes, Masha from the cartoon about the bear, comic book heroes and fairy tales. From salt dough, not only figures and dolls can be made, but also various houses, shops, trees, fountains - in a word, everything that can suggest fantasy.
If it is planned to make enough large figures, it is worth taking care of the internal framework and standing for sustainable standing. As a support for shallow plastics, matches with a remote sulfur head, plastic and wooden toothpicks are suitable for larger products, cocktail spanks or asian cuisine can be required for larger products. Keep wooden sticks from ice cream - they will be able to become the basis of many different products.
For the stability of the figure, you must be placed on the base of the salt dough in the form of a circle or oval - this will provide a flat plane.
If the figure is depicted in motion, it may be necessary to create a wire frame from wire - it will help in the modeling and will not allow the finished product to crumble.
In addition to the bulk, three-dimensional figures of people and animals from salt dough, you can create various fruits or vegetables. They are beautiful and in themselves, and in the composition of various compositions. For example, elegant fruits can be spectacularly lay out on a beautiful dish and decorate them kitchen or dining room.
Flat figures can be cut with molds for cookies. Hearts can become original valentines, Christmas trees - decorate the New Year's table, flowers - used to designate places when clearing guests at the holiday. Only fantasy can limit the scope of the use of various test products.


Spectacular Flowers and Plants from Mukosolki
The top of the skill is thin and elegant flowers from mucosolk, as elsewhere called salted dough. This work requires tremendous adequacy, talent and accuracy, so it is more suitable for adults and adolescents. Kids can successfully sculpt stylized places simple form.
How to make a complex bulk flower, for example, a rose?
- You need to take a piece of dough and roll the core in the form of a drop from it. The base of the drop is the bottom of the flower.
- Then it is necessary to finely roll the dough and cut the rose petals from it different sizes and shapes.
- Gently overlapping one petal after another on a drop-shaped base, you can get a rose harvesting. So that it turns out to be similar to the real flower, each petal must be carefully bent, giving it a natural shape and outlines.
- At the end of work, you need to create a cup of flower with unscrewed cups, cut a few beautiful leaves with carved edges and connect all the details along with the help of wire and slices of salt dough.
- Finished crafts leave up to complete drying, and then painted in the selected colors.

On this principle, you can create any flowers, whole bouquets, complex compositions and even imitation of plants in pots. The selection of the plot depends on the imagination and creativity of the creator. A good example can be a pretty cactus, which is supposed to keep near the computer. Live plant, even such a stable as a cactus, may not survive in an office, but the adorable spiny creation from salt dough will excellently survive any cataclysms.

How to cope with possible problems
In any work, it is possible that the appearance of errors is possible or the case can go not at all as they counted on it. Even if you do everything in stages, considering all the nuances, product defects may appear. It is mainly cracking and chopping individual parts of the product.
Cracks in crafts appear due to improper composition of the test, errors in drying or start painting the finished thing with incomplete drying of the base. If the cracks are small or the surface of the product was covered with a thin mesh of small cracks, they can be frowning.
To do this, it is necessary to dry out a thing, and then carefully sand defects with the help of sandpaper of varying degrees of abrasiveness. You can bring the surface to the ideal "velvet" sandpaper. Then the surviving cracks can be sharpened by several diluted with a dough with salt. Perhaps the procedure will have to repeat several times if the cracks turned out to be very deep.
The resulting lesson will teach that the basis of the future thing needs to be paid much more attention than even finishing - not only the appearance of the product itself depends on its quality, but the very fact of its existence.
It happens that in the process of drying, part of the product simply disappears, especially often it happens with thin details or fragile small fragments. Sometimes the elements of the work are riveted during samples with too intense effects. In order to repaired a toy with a smooth flow line, you can use the usual PVA glue. Applying glue layers need carefully so that ugly sweeps are not formed. A ready and dried thing needs to be treated with emery and re-paint and cover with varnish.
If the product broke out of a fresh dough, the fault sites are quite well mixed with water, press each other individual parts and wait for the collection. Dried work to decorate how planned.
A damaged figure with a loss of individual elements can be triggered to restore, replacing the missing parts by pieces of fresh dough. Dry and fresh elements may not be connected securely, so after drying the new parts it may be needed to glue for strength.
Give yourself and your children pleasure from creativity, because work with the test is easy and pleasant, and the cost of materials is meager. The result of the work may exceed any expectations!
6
Happy child 13.09.2017

Dear readers, many of us have children and grandchildren love creativity. And it is wonderful. We offer children paints and pencils, markers and plasticine. And more and more often in children's educational centers, gardens and schools instead of plasticine use salted dough for modeling. Manufacturers of stationery and goods for children quickly caught this wave and posted dozens of types of salt dough on the shelves. What only it does not happen! And color, and just white, and brilliant.
Of course, you can buy a ready-made set of color test. But it is quite real and completely easy to make it himself, at home, because flour and salt will surely find in the kitchen at any hostess. Today, the host's leading heading Anna Kutyavin has prepared an excellent selection of salted dough recipes for you. I give Anna the word.
Hello, dear readers Blog Irina! The modeling with plastic materials is a very useful lesson for kids. After all, it not only develops a small man's hand, but helps the child to master spatial thinking, textures, colors and shapes. In addition, often children have a real creator of something new and meaningful.
The modern industry offers a large selection of plasticine for modeling. But now I would like to talk about the salty test, as a good alternative to the purchase of plasticine. The main advantage is safety. Due to the fact that the salt dough makes only safe ingredients - flour, salt, water, food dyes of high quality - it is an ideal option for the first creative experiences of the baby. After all, if the child pulls a piece of plasticine in his mouth, it is, to put it mildly, will be unpleasant for him. And from salt dough, in case of what, harm will not.
In addition, salt dough can be quickly and easily done at home. The ingredients are very accessible and there is in any kitchen, and the recipes are so simple that they will not even require any significant effort. But what is a wide field for creativity!
Benefits of salt dough for modeling
The dough for modeling is a mass similar to ordinary plasticine. But, in contrast to the usual solid pieces of color plasticine, salt dough:
- much softer and more pleasant to the touch;
- will not stick to the hands;
- not dirty hands and clothes;
- does not have an unpleasant odor;
- does not cause allergic reactions;
- safe when hitting in the mouth, but at the same time tasteless - the child can try it, but immediately turns and will lose interest to him.
Types of dough struts
Creative teachers and moms with dads came up with a lot of salted dough recipes:
- classic salted dough;
- cooked in the microwave;
- boiled on fire;
- luminous in the dark;
- with starch;
- with the addition of glycerin, citric acid, vegetable oil, spices, children's cream and even the wallpaper glue.
The temperature of the obtained test may affect the temperature of the water, the quality of flour, the number of components. So if suddenly the first time it turned out not exactly what you expected - not trouble, try more. Many mothers share that they interfere with the mixture on the eye, and it turns out wonderful.

Features of the preparation of salt dough
In order for the dough to be successful, you must consider several important points. Firstly, the flour is better to take only the usual, wheat, other species - pancake, with different additives - are not suitable.
Secondly, Salt is more suitable, "Extra". Large salts grapes can give crafts untidy look. Although there are recipes and with a large salt.
Thirdly, the water is best used cold, even ice. To the dough it turns out more plastic, potato starch is added to it. And to increase the strength of the material in the recipe, PVA glue, diluted in water. To obtain a high-quality test, it must be intensively mixed with his hands.
High-quality dough is soft, dense, elastic, it will not crumble and will not stick to the hands, has a homogeneous color.
You can paint the dough either immediately at the kneading, or then paint the ready-made craft. You can paint as special food dyes, and self-created from cocoa, carrot or beetroot juice, coffee. The dried product is then painted with gouache.
The finished material for the modeling is wrapped in a package and keep in the refrigerator a couple of hours. Use the dough is permissible for a month if you store it in the cold.
How to make salted dough for modeling - recipes
We will now consider the most reliable and at the same time uncomplicated dough recipes. In addition, the smaller the child, the dough it should be easier - from complex recipes with the "inedible" components better refrain. Consider the recipes of a salt dough for beginners step by step.
Classic salty
From such a material you can make any crafts, it is safe and very simple.
Ingredients:
- white flour - 200 g;
- small salt "Extra" - 200 g;
- chilled water - 125 ml.
You need to pour salt into flour and mix well. Then, in a dry mixture, pour water with small portions, stirring all the time to get a homogeneous and smooth mass. It is also important to monitor the consistency of the test - it should not be very liquid.
Second classic recipe
This recipe is very popular both among experienced masters, and among beginners in the modeling.
Ingredients:
- white flour - 300 g;
- salt - 300 g;
- cool water - 200 ml.
Take a deep bowl. Pour salt into it, add some water. When the salt is dissolved, add sifted flour to the mixture. Start kneading in the dishes, and when a lump is formed, move the mass on the table and domain. In order for the dough to be plastic, gradually enter water.
From this number of components is a lot of test. If you do not plan large volumes of crafts, you can reduce the amount of ingredients 2-4 times.
Saline mass in the microwave
In the microwave oven you can quickly cook the dough for modeling.
Ingredients:
- water - two parts of water;
- coarse white or rye flour - two parts;
- small salt - one piece;
- wine stone - 1 tbsp. l.;
- dye food;
- vegetable oil - 1 tbsp. l.
Mix all components. Pour the resulting mass into the form for the microwave oven. Keep in the oven at the middle power five minutes. When the mass be cooled, it must be carefully kneaded.
Salted dough in 5 minutes
The dough on this recipe is well suitable for those who love to sculpt a lot, often and the whole family.
Ingredients:
- water - 1 cup;
- flour - 1 cup;
- salt - 0.3 cups;
- soda - 2 h.;
- vegetable oil - 1 tsp;
- food dye.
Pour into the tank of soda, salt and flour, pour water with vegetable oil. Then put a saucepan on a small fire, heated for a few minutes.
Add the dye and mix well. As soon as the dough starts to pester to a spoon, turn off, it is ready. Put it on a plate, let cool. Then, frow it well.
Such quick dough is famous for another feature - if you follow the storage rules, keep it in the refrigerator, the mixture retains its properties for several months.
Elastic dough
This recipe allows you to get very elastic material with which it is easy to work.
Ingredients:
- wheat flour - 1.5 glasses;
- water - 1.5 glasses;
- salt - 2 glasses.
Mix dry components and gradually pour water until the mixture becomes plastic and homogeneous. Crafts from such a test will be solid and aesthetic.
Dough from salt
Such material will be quite a lot, so if you need a small portion, the amount of components several times should be reduced. The composition is like a classic dough, only the large salt is taken instead of small.
Ingredients:
- large salt - 300 g;
- wheat flour - 300 g;
- water - 200 ml (1 cup).
Pour salt, pour most of the water into a large container. When the salt is dissolved, the sifted flour sweeps into the liquid. The dough is mixed.
Salted dough, luminous in the dark
Such dough accurately like children!
Ingredients:
- warm water - 2 glasses;
- white flour - 2 glasses;
- salt - 2/3 glasses;
- vitamin B in capsules or tablets - 2 pcs.;
- vegetable oil - 2 tbsp. l.;
- wine stone - 4 h. l.
Grind vitamins to powder condition. Mix it with salt, flour and wine stone. Pour water and oil, mix to homogeneous mass.
Cook on slow heat until the mass becomes sticking and reminding plasticine.
Recipe for bulk figures
Such dough makes figurines durable and strong.
Ingredients:
- white flour - 200 g;
- salt - 400 g;
- water Ice - 1.5 glasses.
Dissolve salt in water. Let's gradually pumped the sifted flour. Check the dough.
Dough with glue (not for young children!)
This recipe is not quite natural, but it helps the mixture faster grabbing and drying.
Ingredients:
- flour - 1.5 glasses;
- water - 1.5 glasses;
- salt - 1 cup;
- glycerin - 4 tbsp. l.;
- dry wallpaper glue or PVA - 2 tbsp. l.
Mix everything except glue, knead the dough like on dumplings. Add glue precompanied in a small amount of water. The resulting mass is well stirred.
More tips on the lightweight salt test can be found in this video.
Drying salt dough at home
Cooked figures need to dry well. It is possible to do this outdoors, on the street or indoors, where the fresh air flow circulates. This option is the most economical drying.
It is best to dry the crafts under the rays of the sun. The thicker the product, the longer you have to dry. The color after hardening the craft will not change.
The second version of the drying is an oven. A couple of days, the products are dried in the fresh air, then heated the oven to 50 ° C. It is necessary to store the straight of the paper, lay out the crafts and dry, increasing the temperature to the maximum up to 140 ° C. At 50 ° C drying lasts approximately 3 hours, at 140 - half an hour. But immediately put the maximum temperature should not be - the products can crack.
If the figures still crackled, it is possible to fix it with a mixture of PVA glue and conventional flour, filling the crack with a thin tassel.
To understand whether the product succeeds, you should simply knock on it. The deaf sound suggests that the figure is still raw, and the ringing is what is ready.
How to arrange crafts
The finished figures are painted with paints. It is better to take acrylic - they do not paint the skin, do not smear and dry quickly. You can paint a gouache mixed with PVA glue, and even watercolor. And you can simply leave products in original form.
When modeling, you can use different decor elements: beads, buttons, threads, ribbons, small shells, cereals and pasta. If the product has crackled, you can lear it out in the fresh air, then eliminate flaws using sandpaper and paint again.
Protect the handicraft from defects can be lacquered. Also, this measure will prevent the paint burnout and retain the aesthetics of things for a long time. Liquid varnish will make a ruddy crawl, give it a natural shine. A thick reliably protects from the impact of moisture, make the surface of the product matte or shiny. Luck aerosol protects the surface from damage and make it brighter.
Salt dough crafts
Now I suggest you see what crafts you can do with your children. Photos of such crafts sent us Pavlovsky Anya. Her daughter Svetlana is five years old under the leadership of the teacher of the seed Tatiana Viktorovna (MBDOU kindergarten №32 Izhevsk) made this beauty from a salt dough.


Choose a recipe that will suit you most, try and create together with children. After all, childhood is a wonderful time when any manifestation of fantasy becomes a masterpiece! So let the creativity be not only cheerful, but also safe!
Joyful creativity to you and your children!
Anna Kutyavina,
psychologist, fairy tale,
Mistress site fabulous world
I thank any for such a creative theme for everyone. Agree, sometimes you begin to do something with the children and also fond so. So not only our children enjoy such classes, but also we ourselves can so distinguish between the routine, immerse yourself in creativity, relax the soul. And, of course, this is such a wonderful reason to be with your children and chat with them.

From the salt dough you can make a huge amount of crafts, for example: flowers, animals, various figures, inscriptions, numbers, toys, paintings and everything you want! Salted dough modeling is called biocheramics. The advantage of the salted dough is that it is convenient to work with it, this material is absolutely harmless and crafts will delight you for several years. In this article we will look at how to make crafts from salty dough with your own hands.
You will need: A glass of wheat flour, a glass of extra salt, a glass of cold water, a bowl.
Recipe
The finished salted dough should not stick to the hands or crumble. It should be steep and convenient for modeling. Recommended for watching video master class!
There are two most common ways of drying salted dough. The first way: the finished handicraft dries itself. The main thing that the straight sun rays did not fall on it, otherwise it cracks. The crawler can be put on a flat surface and wait a few days. The second method: the finished handicraft is dry from 3 to 6 hours (depending on the sample size). Drying occurs with interruption approaches. One approach is 1-2 hours. To quickly drying in one approach, install 75-100 degrees in the oven, and then, the exercise will dry in an hour. At a temperature of 120 degrees, the exercise will dry in 30 minutes, but it is better to dry in a natural way.
There are two most common ways of painting salted dough. The first method: the finished craft after drying is painted with acrylic paints or gouache using a brush. The second method: food dyes are bred in water, then added during the preparation of the test. When the snaps are completely painted and sucked, it must be coated with transparent manicure or furniture varnish in 2-3 layers. Each layer before applying the next should dry. In this way, the aircraft will last for a long time.
You will need: Painted salted dough, stack, transparent manicure varnish, toothpick.
Master Class

Salted Test Star!
Salty dough caterpillar
You will need: Painted dough, knife, PVA glue, toothpick, suspension, transparent manicure varnish.
Master Class
- Roll off the sausage.
- Cut it on 6 equal parts.
- Ride balls.
- Spread 5 balls with each other.
- Stick your head.
- Take the spout and eyes, then stick them.
- Protect the toothpick place for the suspension.
- Dry the crawl.
- Attach the suspension.
Caterpillar from salt dough is ready!
Salty dough apple
You will need:
Master Class
- Take the apple half the interior part to make a flat, pressing to a smooth surface.
- Take a thin flat middle and glue to the main part.
- Roll 6 seeds and wand, then stick to the apple.
- Take the leaves, then stick them.
- Dry the crawl.
- Cover and wait for complete drying.
An apple from salt dough is ready!
Salted Doughcloth
You will need: Painted salted dough, PVA glue, transparent manicure varnish.
Master Class
- Take the body of the elephant, having rolling the elongated ball.
- Take 4 legs in the form of plump sausages.
- Take the trot.
- Take the ears of the elephant in this way: roll 2 flat cakes, stick to them cakes of the same form of a smaller size of another color.
- Take a small tail.
- Blind eyes.
- Collect elephant by such a sequence: glider legs with a torso, then glue the trot, then ears, eyes and tail.
- Dry the crawl.
- Cover and wait for complete drying.
Salted Salon Dough is ready!
You will need: Salty dough, foil, vase for candies or similar plastic containers, gouache, brush, transparent manicure lacquer, skidding for modeling, knife or stack.
Master Class

You will need: Salted dough, manicure scissors, PVA glue, acrylic paints either gouache, brush manicure varnish.
Master Class

Hedgehog from salt dough ready!
Owl (Filin) \u200b\u200bfrom salt dough
You will need: Salty dough, PVA glue, nail file, manicure scissors, acrylic paints or gouache, tassel, wooden plate with suspension, transparent manicure varnish.
Master Class

Owl from salty test is ready!
You will need: Salted dough, the basis for which can be attached to the classroom for example a plate or a plate, stack or a knife, a sheet of paper, a simple pencil, a garlic pump, a row, PVA glue, acrylic paints or a gouache, brush, transparent manicure lacquer, carnation.
Master Class

Basket with salted dough fruit ready! Recommended for watching video master class!
You will need: Saltic dough, knife, rolling pin, simple pencil, sheet of paper, sandpaper, acrylic paints or gouache, brush, transparent manicure lacquer, adhesive gun or PVA, base for crafts, for example: table with frame, transparent manicure lacquer.
Master Class
- Draw a cat or print a template.

- Roll the dough with a thin layer.
- Apply the template and cut the cat.

- Dry the crawl.
- Collect the craft of sandpaper, removing irregularities.
- Simple pencil transfer the desired drawing on the body of the cat.
- Color the paints and wait for complete drying.

- Stick the cat to the base with the frame.
Salty dough pencil
You will need: Water, flour, extra salt, cardboard jar for frame, PVA glue, scissors, decorative harness or corrugated paper, gouache, tassel, butt, stacks, acrylic varnish for crafts, toothbrush.
Master Class
- Check the salt dough in this way: pour the glass of flour, a glass of salt, add water, then slow down to the desired consistency of the modeling. Separate part of the test Add beige guasi, then slow down.
- Roll the cake with a thickness of 10-15 mm.

- Apply PVA glue to the outer side of the cans and wrap the test. Surplus cut the stack, and join the joints of the joints with a wet brush.
- Create a small point texture of a toothbrush on the surface of the test.
- Mix the dough brown, roll it into a cake with a thickness of 10-15mm.

- Cut the strip of a width of 5 cm made of brown dough and stick to the bottom of the jar.
- Flue from white test 2 large basics for the eye of the owl, then stick them.
- Take the beak from the brown dough and stick it.
- Blind eyes from turquoise dough and stick them.
- Stay 8 stripes of pink dough, twist 4 flashes of them and blind a bow, then leave it dried for 2 hours.
- Take the wings of the owls in the form of droplets from brown dough, then glue them.

- We gossip the harnesses from beige dough and stick to the neck of banks.
- Skip the sausage from a white dough, draw the stack of the texture of the lace and stick as a collar under the beak.
- Put the crawl into a warm place for a day.
- Paint the bottom and wings brown gouache and decorate with white dots.

- Draw pupils and eyelashes of black gouache, wait until the paint gets up, then draw white glare on the eyes.
- Stick pink bow over the wing.
- stick on the lace butt with a bows from corrugated stripes.
- Cover the craft of varnish and wait for complete drying.
Pencil from salt dough is ready!
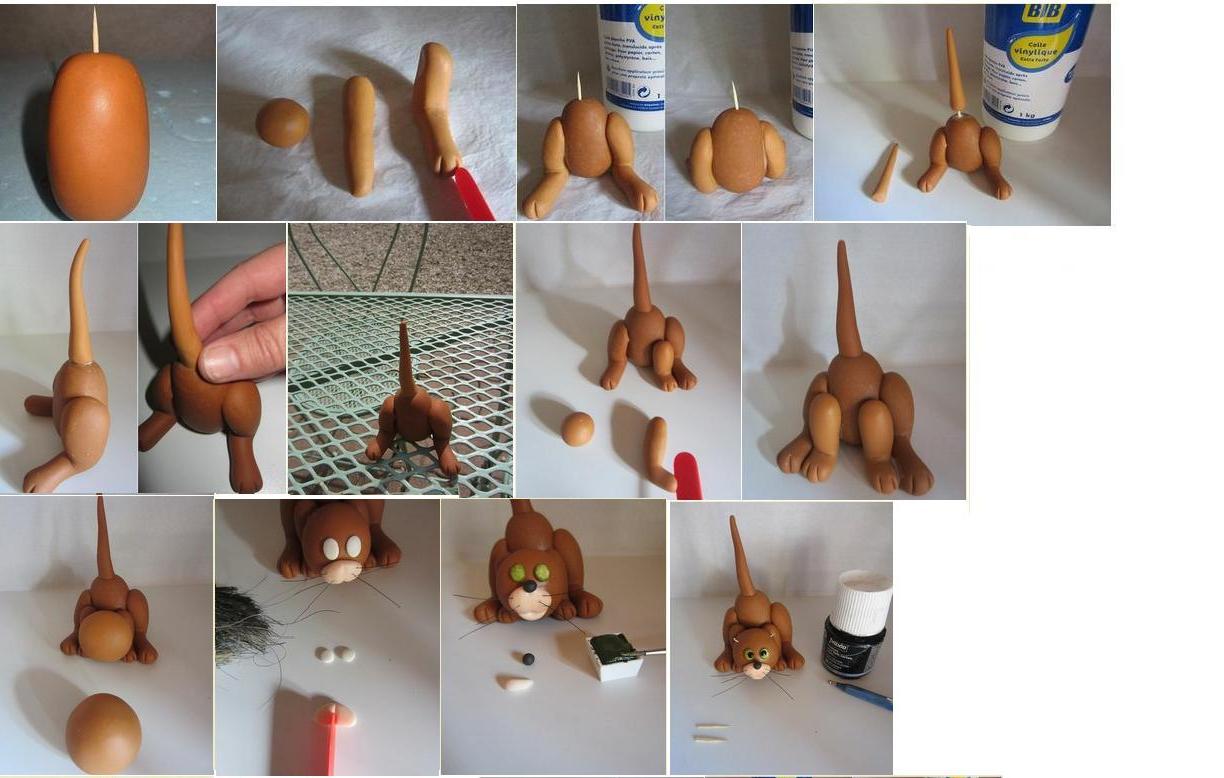
Salted dachshund
You will need: Saltic dough, simple pencil, scissors, cardboard, paint, brush, rope, toothpick, foam sponge, transparent varnish, plow glue.
Master Class
- Draw on cardboard dachshund, as shown in the image.
- Cut the template.

- Roll the dough with a thickness of 5 mm and cut the dachum by the template.
- Stop oblong eyes, then stick them.
- Take the eyelids and stick to the eyes.
- I designate the toothpick paws, nose, mouth, ear and body contours.

- Stop oval, then stick it on your ear and graduate with a wet with a wet finger. In the same way, give the volume of the rear of the dachshund and the tail.
- Note the stripes in different directions around the perimeter of all the fees, in such a way that the strips resembled wool.
- Dry the figure.

- Get the cutting segment to the opposite side of the crafts, for further hanging.
Dachshund from salt dough ready!
Mushroom Borovik from salt dough
You will need: Salty dough, light bulb, paint, tassel, foil, cardboard, greasy tape, superchalter, pva glue, paper napkins, transparent varnish, stack.
Master Class
- Plug the light bulb with scotch, then break the test and dry the workpiece.
- Cut the ring from the cardboard and put it on the light bulb as the base for the hat.
- Form the hawk of crumpled napkins, then lock the scotch.

- Wrap a foil hat.
- Roll the dough with a thickness of 5 mm and break down the hat.
- Remove the leg with the legs, break through it with the dough and make stripes with a stack.
- Stick the leg on the leg.

- Take the fungus of the handle, legs and spout, then stick them to PVA.
- Take the caterpillar and stick to the hat.
- Dry the figure.

- Color the figure, then leave to dry.
- Cover the craft of varnish and wait for drying.
Mushroom Borovik from salt dough is ready! I recommend to view this video!
Funny Grys from Salt Dough
You will need: Salty dough, paints, brush, foam sponge, stack, thin rope, toothpick, black helium handle, PVA glue.
Master Class
- Shot 2 balls for the patch and do toothpick nostrils.
- Take the muzzle, stick the patch and eyes above it.
- Take the ears of the triangular shape, stick them, then take the stripes with a stack in places of connection of the ears and head.

- Take the heart and glue it in the bottom side.
- Do deepening around the edge of the whole circle.
- Do the toothpick 2 holes on top for mounting rope and 2 holes from the bottom for the legs.

- Roll the handles and stick them in this way so that they keep the heart.
- Take the hoof and do the holes for the rope.
- Dry the workpiece.
- Paint the blanks of black paint and let them dry.
- Wash the paint with the convex parts of the workpiece under running water with a sponge, and wait for drying.

- Straighten the figurines with a sponge with white paint.
- Coloring piglets.
- Draw small parts with black helium handle.
- Cover the craft of varnish and wait for drying.

- Stick woolen threads as hair.
- Make the pendant from the rope.
Funny pigs from salt dough are ready! I recommend to view this video!
0 82 802
Lrack is one of the most useful things for kids. With its help, it is not only a small man's hand developing, but also produces prude, figurative thinking and coordination of movements.
One of the best materials for modeling with the child is a salt dough. It is absolutely safe, does not contain harmful additives and easy to work. Crafts from salt dough will be remarkable souvenirs with your relatives and relatives.
Universal recipes
Salted dough recipes can be found a great set. Each master contributes to them their additives, selecting the desired consistency. The main food kneading products are salt, flour and water.Depending on the purpose of its density can be different:
- dense dough - for large parts and creating massive panels;
- universal dough of medium consistency - it is convenient to make small pictures and figures from it;
- soft dough - gentle and pliable, it is suitable for small elements, refined colors and figurines.
Tight dough
To work, you will need:- wheat flour - 1 part;
- food salt - 1 part;
- water - 0,7 parts.
That is, to knead this type of test, you need to take one of the same measurement (glass, cup, tablespoon) salt and flour and 0.7 of the same measurement of water.
In the deep bowl, connect the dry ingredients and gradually tighten the cold water. The dough should be homogeneous and very dense. It will remain the grains of salt - this is normal, do not worry. Depending on the moisture and quality, flour and salt may be needed slightly more or less water. Therefore, it is impossible to pour it into the dough all right away.
Middle Consistency Dough (Universal)
To work, you will need:- wheat flour - 1 part;
- water - 1 part;
- food salt - ½ part;
- salt of fine grinding (extra) - ½ part.
Soft dough
To work, you will need:- wheat flour - 1 part;
- water hot - 1/4 part;
- salt of fine grinding (extra) - 1 part;
- pVA glue - ¾ parts.
Such dough is ideal for complex works. It is perfectly holding the form, keeping the print and the texture created on it. Its quality is directly dependent on the quality of the selected glue.
Figures flattened from salt dough with glue, differ special strength. They will delight their owner not one year.
- If you plan to paint ready-made products, it is better to take wheat flour, although rye can be used for salt dough.
- You can not take iodized salt - the finished figures can crack when drying.
- The dough can be tangled during the kneading. For this, food dyes are used or watercolor.
- The finished dough must be wrapped in the food film or the cellophane package to prevent its drying.
- Unsuccessful dough can be reanimated. In the liquid you need to add some more flour and re-elevate, too tight the dough is wetted with water and smeared, achieving the desired consistency.
- Do not add fat or hand cream to the dough, the products from which is planned to be painted - the paint will fall unevenly.
- The finished dough should be stored in the refrigerator no more than 2 days. It loses its qualities and work with it is inconvenient.
- Volumetric products are best sculpt on wire or cardboard frames so that they do not fall apart.
- Divieties can be dried naturally, leaving them for a couple of days, bake in a warm oven or leave near the battery. On the battery itself, it is categorically not recommended to install figures to avoid their cracking.
- Cancel crafts best acrylic paint or gouache. Watercolor should not use: there is a risk to twist and spoil the product.
- The place of the interface should be moistened with water with a brush. So they firmly and quickly connect.
- Ready souvenir can be covered with colorless nail polish or acrylic varnish. This will protect it from humidity, and paint - from fading.
Cute hedgehog - toy for kids
Want to know what you can do with the child from the salt dough? Start with the easiest craft. The younger than your crumb, the easier it should be products for joint creativity. Try to blind a broken hedgehog, and a detailed description of the process in this MK guarantees an excellent result and a good mood from a useful classes.
First of all, prepare the universal salt dough and manicure scissors. From a piece of dough, roll the drop-like blank.

Eye and nose with hedgehog can be made from beads, black pepper peas or dough painted in advance.

The needles are made with cuts. Scissors make small cuts, raising needles up.

The next row perform in a checker manner - with a displacement. A row for next to do shorts until the entire head of the hedgehog is covered with needles.

Dry the finished toy in the oven or simply in a warm and dry room. Optionally, you can paint it or entrust it to a child's important thing.

Original Souvenir - Merry Dachshund
You can begin preparation for the coming New Year holidays in advance and make a funny taxis as a gift to friends.
To work, you will need:
- salted dough universal (see the recipe above);
- cardboard, simple pencil, scissors;
- paints and brush;
- a piece of rope;
- clear nail polish;
- toothpick;
- foam sponge;
- glue "Dragon".
Transfer the template on a cardboard sheet and cut.

Roll the dough with a thickness of about 5 mm on baking paper. Attach molds and cut out the contour of the taxes. Carefully remove trimming, so as not to deform the workpiece.

Shot two balls and form the applicant's causal eyes from them. Stick them on a drip of water to the head of the workpiece. Moisten all the dogs of the dog and swallow your fingers to remove all irregularities.

Of the two small pieces of the dough, make eyelids and stick them over your eyes. Toothpicks, notice your ear, paws, mouth, nose and body contours.

Now you need to give the volume of the workpiece. Shot out of the dough oval, stick it into your ear and lay the wet shake.

Similarly, give the volume of the rear of the taxes and its tail.

Sell \u200b\u200btoothpicks oblong dents around the perimeter of the figure. Make them chaotic different lengths from body edges to the center.

It is time to dry the workpiece in the warm oven. Bake it until it becomes completely solid.
Dry figurine need to paint. Cover the black gouache all areas where there are bulges and dents.

After drying the first layer of paint, paint the dachum yellow. Type a few paints on the foam sponge and toned the whole body, while dents should remain black - do not overdo it.

Drain dance to paint with white eyes. Optionally, do any inscription.

To the back of the crafts glue a piece of rope.

Cover the product with a transparent varnish and let him dry. The result of the work done is impressive - a naughty puppy is ready.

Dog with original coloring:


Spectacular Fish - Step-by-Step Master Class
Try to make a beautiful fish with the child. Just follow the detailed instructions - and even a small assistant will be able to master this technique modeling.
To work, you will need:
- salted dough universal;
- brush;
- corrugated feltwaster cap;
- line.

Squeeze on one side of the circle with two fingers dough, forming a tail.

Correct it and grate the irregularities.

From the opposite side, make a fish mouth handle with a handle.


Ribbed line or blunt side of knife Production prints on the tail and fins.

Roll away the small balls and stick them on the head of the fish. It will be eyes.

From smaller balls, make pupils and give them to the eyes of the tassel handle.


It's time to decorate the workpiece. Flomaster hat sell the first row of scales.

Shot a lot of small balls. Stick them on a drip of water to the body of the fish immediately behind the prints of the cap and flatten the back side of the tassel.


If there is a suitable impression, make prints in the shape of a starfish, no - go around the already familiar cap or take another pattern.

Then sell two more rounds of the cap.

Roll down a thin sausage for decoring the tail.

Stick her billet on the edge of the tail. Similarly, fill the entire tail.

Next, chaotically stir up and sell some more small balls.
The resulting workpiece is dried in a warm oven.

Coloring the fish, guided by its ideas about the beauty and paints available. If you stick to her from the reverse side of the magnet - she proudly takes its place on the fridge, decorating the kitchen of his happy owner.
And here are some more ideas with fish:


Cheerful Mushroom Borovik
The initial stage of learning the modeling is already behind - can be taken for more complex products from the universal salt test. Try to mask the lesson for the manufacture of a funny Borovka. Such an interesting fungi will appreciate not only the child, but also an adult.
To work, you will need:
- salted dough universal;
- blurred light bulb (classic pear-shaped);
- cardboard;
- acrylic paint or gouache;
- foil;
- paper napkins;
- malyary Scotch;
- super glue.

Cut the ring from the cardboard and put on the light bulb - this is the basis of the future mushroom cap.

From crumpled paper napkins, create a hat for the desired value. Crerate with scotch design.


As a result, it turns out such a billet.

Wake up a foil hat for greater strength.


For a hat, you can use the dough of any color, later the entire toy will be painted. Take a piece of dough into a thickness of a thickness of at least 3 mm and take off the top of the mushroom cap.

Remove the hat and shove her bottom.

Stupid side of the knife sell strips.

Secure the hat on the feet of the mushroom with a superclone or moment. It should be slightly tilted toward the back.

Cut up the design. Blind and secure the handles, legs and spout on the fungus.


You can decorate a figurine with a funny caterpillar or to blind another decor element, such as God's cow.

Dry decorated workpiece.

Color the figure, draw eyes and spout and cover with varnish. Amazing fungus ready. Call and eat it will not work, but to decorate them the shelf - easily.

Funny pendants
Such funny suspensions are an idea of \u200b\u200ban unusual Christmas toy or a cute souvenir expensive for you.
To work, you will need:
- salted dough universal;
- toothpick;
- thin rope;
- paints and brush;
- foam sponge;
- black gel pen;
- super glue.
Greetings to you, dear parents, readers of our blog! Recently, an old technique has been reborn for the development of a baby's shallow motility - modeling of the dough. And today I want to tell more about the salt dough for modeling. Recipes with photos can be found at the end of the article.
The modeling is a great opportunity to express or relax for adults, as well as to develop a shallow motorcy and fantasy for children. Engaged with children - it's fun and interesting. The big advantage of salty dough modeling is that it will cost you much cheaper than other materials for children's creativity.
Pottery clay, and plasticine, and ordinary dough during joint cookie or dumplings can be used for modeling. Children love to sculpt and roll balls from such materials. Salted dough is used exclusively for creativity, because it is inedible.
Found from salt dough Lepi:
- Neighborhood;
- Kids toys.
Now this kind of creativity is becoming popular again, you can make it possible to make:
- Decor items;
- Figures, toys;
- Paintings;
- Prints of handles or baby legs.
It is no secret that such a kind of modeling is very like to engage in adults, preferring salt dough clay or gypsum, flashes whole pictures that adorn the house or give as a present:

2. Why exactly salty dough
Many surprisingly hear that the dough must be salty so that it could be something like something from it. The fact is that it is possible to sculpt from any dough, because it is always plastic, but not from any test you can make crafts that will be stored for a very long time, without losing appearance.
The secret material - salt - cementing the dough, so the products are kept after drying. The main ingredients of such a test:
- Flour;
- Salt;
- Water.
In addition, you can add other components, depending on what you want to get. It can be glue, butter or paint that can be added to any recipe. But the main thing here is the salt, which should be fine grinding and without impurities (iodine).
3. Salted Dough Recipes
Recipes can be a lot, consider several of them. Flour need to choose the simplest, without additives, and the water is very cold.

3.1. Salted dough usual
Structure:
- Wheat flour - 1 tbsp.;
- Salt - 1 tbsp.;
- Water - 0.5 st.
How to make from these ingredients material for modeling?
- You need to mix flour and salt, then gradually pour water, quickly stirring all your hands.
- The knead the dough is shorter, if it turns out tight, add some more water.
- If the dough sticky - add a little flour. It all depends on the flour, so water may occur sometimes more, sometimes less.
3.2. Salted dough with rye flour
Structure:
- Rye flour - 1 tbsp.;
- Wheat flour - 1 tbsp.;
- Water - 0.5 tbsp.;
- Salt - 1 tbsp.;
- Oil - 1 tbsp.
Rye flour will give the product a soft brown color, especially if you dry it in the oven. Almost rye flour is not used, as the dough will get very tight and it's hard to cut out of it. Oil will give test elasticity, it will not stick to the hands.
3.3. Salted dough with glue
Structure:
- Flour - 2 tbsp.;
- Salt - 1 tbsp.;
- Wallpaper glue dry - 2 tbsp.;
- Oil or glycerin - 4 tbsp.;
- Water - 125 ml.
- First you need to connect the flour and salt, then add a glue diluted in water.
- All mix and add oil.
- If the mixture is sticky - add a little flour. In addition to the wallpaper glue, PVA glue is used, this is done for the strength of the material.
How to cook color dough?
To cut the dough, you can add food dye or natural juice, adding dropwise and stirring with a finished mass. In addition, you can paint the finished handicraft, after it dries, using artistic paints.

4. Crafts from salt dough
As soon as the baby is 1-1.5 years old, it can be acquainted with the test, as a way of playing and development.
The dignity of the test also is that the child will not be poisoned if it tries it, and it does not smell like plasticine. Such natural material is an excellent means for making crafts. The dough can be stored in the package in the refrigerator a few days.
A child of any age can use the technique of modeling salted dough, gradually complicating the task. For beginners, it is best suited for small simple figures.
The child can do the following:
- Roll the dough with a rolling pin
- Cut out of it shape figures (from the designer, cubes or molds for cookies);
- Sculpt sausages, balls;
- Connect several elements into one figurine (mounting buttons, sticks, beads);
- Do stick pen or legs on a rolled dough;
- Collect the faded figures or crafts with paints (watercolor, a mixture of gouache with PVA glue, acrylic paint) - under the supervision of adults.
A child can stack on a thin dough layer. Different elements, creating pictures. Also, ready-made flat figures can then be pasted onto the canvas and insert into the frame, receiving a work of art.

5. Drying of salty test products
There are such types of drying:
- on air;
- in the oven;
- on the battery;
- in the sun.
Anyway, the products need to dry well. If the test layer is thin - the time will leave for it less. Volumetric pictures from dough or figurines need long drying.
The most faithful and easy way to dry in the air is best in warm, but not under the right sunlight. For a product, thick up to 1 cm, you will need 4-7 days. Then check by knocking on the surface with your finger. If the sound is ringing - the product dried, if deaf - you need to dry.
For drying on the battery, it will be necessary for about one day, in the summer you can lay out the product on the windowsill.
When drying in the oven, you need to set a low temperature (50-150 degrees) with the door open. It will be needed about 3 hours for a fine product.
After drying, the craft can be painted or covered with varnish to protect the surface from damage and fragility.

Watch the video about how easy it is and just cooking salt dough, here:
Develop with your kids, sculpt and create yourself in joy! Subscribe to updates and share an article with friends in social networks! And I am waiting for you on our site again.