Make a paper cake. Paper cake: an unusual DIY gift
If you do not know what to give for your birthday or Valentine's Day, you should pay attention to such an original souvenir as a paper cake. This is a very interesting gift, because you can put small postcards with wishes or other present inside. The cake-shaped surprise box looks very interesting and unusual.
How to make a paper cake?
Various gifts and gifts can be easily wrapped in a paper cake. For example, you need to make as many "pieces" of cake as there will be those invited to the party. And inside each place a note with sincere wishes.
- Ribbons - for decoration
- Beads - for decoration
- Long ruler
- Needle (large)
- Ready template
- Wishes on a small piece of paper or a souvenir
- Adhesive (can be replaced with double-sided tape)
- Sharp scissors
- Colored paper (thick)
Instructions:
- We make a template for a piece of cake from thick paper, and then transfer it to paper (colored).
- To make it easier to transfer the template to a sheet of paper, you should use a large pin. The fact is that, unlike a simple pencil, there will be no visible prints after the pin.
- With the help of a needle and a ruler, you need to draw all the fold lines.
- We take scissors and cut out a template - we make as many of them as there are pieces of cake. Typically, about 8-12 pieces are used.
- We fold all the cut out blanks along the fold lines in the form of small boxes and glue them.
- We decorate all the glued parts with ribbons and beads - here you can completely surrender to the flight of imagination and use all the available means.
- Pieces of cake decorated with hearts, multi-colored beads, decorative rhinestones and flowers made using the quilling technique look beautiful.
- We put a note with wishes or a present inside each piece of cake.
- We form a cake from the pieces and tie it with a beautiful ribbon so that it does not crumble.
- You need to place the finished cake on a beautiful cardboard tray. This dessert can be either colored (each piece of cake is of a different shade) or monochromatic, and use paper flowers and various figurines for decoration.

It is possible to create a paper cake according to a different scheme. In this case, you need to take:
- Hole puncher
- Ready template
- Paper glue
- Double-sided adhesive tape
- Colored ribbons
- Sharp scissors
- Paper (different colors)
- Multi-colored cardboard (A4 format) - for each tier of dessert you will need 11 sheets
Instructions:
- For each tier, we make exactly 11 pieces.
- We apply a template to the cardboard. It is cut along the solid lines of the workpiece, then they are bent and folded in the shape of a triangle.
- Glue the spout, as well as the side edge of each piece.
- First we bend the short sides inside, and on top the long sides are folded and fixed in the cuts made.
- We put the ends together, and with the help of a hole punch, small holes are made.
- It is necessary to stretch the ribbon through the hole, then the blank is wrapped with a ribbon in the middle. Stretch the ribbon into the next hole, then tighten the edges in a bow shape.
- Each piece of cake is decorated with a variety of decorative elements.
- We take a stand-dish and put all 11 triangles on it, which we fasten together with double-sided tape.
- Cut out not very large stripes from colored paper, after which we wind them onto a pencil. We decorate the finished cake on top with the resulting curls.
- Using this scheme, you can make a single-tiered or multi-tiered cake. Some pleasant surprise can be placed inside each piece.
Cake with wishes made of paper: making

To make such a cake, you will need to take the following materials:
- Scissors
- Rhinestones
- PVA glue
- Colored beads
- Lace
- Colored ribbon
- Colored paper - 13 sheets
- Wishes on colorful leaves
Instructions:
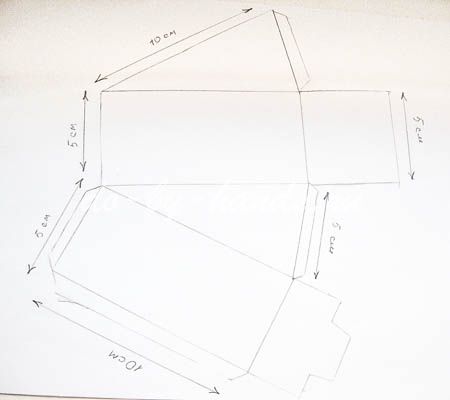
- First you need to make a template - the long side should be 10 cm, and the short side 5 cm. You can print the template on a printer. Thanks to the prepared template, it will be possible to significantly reduce the work time.
- Cut out the template and transfer it to colored paper, use a ruler to draw all the fold lines.
- Folds must also be performed under the ruler, so that the created boxes will be beautiful and even.
- We connect the edges with glue - first we glue the sharp corner, then the side.
- We put a note with wishes and some kind of small souvenir inside each piece of cake. If the boxes are made of thick enough cardboard, then we just bend the ends, and if they are made of plain paper, we glue the PVA together.
- Now we are engaged in ribbon decorations - we make small bows from ribbons and lace. We fix a variety of decorative elements with glue.
- Fold all the pieces of cake and tie them with a ribbon.

Such a souvenir is just perfect for a presentation on March 8 or a romantic evening with a loved one. Inside the paper cake you can place:
- Inscription - I will bring hot coffee every morning, and pour in a few grains of aromatic coffee.
- The inscription - eternal luck and positive. Place dice or a small horseshoe inside.
- Inscription - a sweet life awaits us, and inside you can put your favorite sweets or small chocolates.
- Inscription - I wish you many happy days, and pour paper emoticons.
- The inscription - boundless and eternal love, put a plush heart.
- Inscription - home warmth, put a scented candle.
- The inscription - heavenly rest, and inside, place seashells or mini-glasses.
- The inscription - a luxurious and carefree life, put a toy limousine inside.
- The inscription - fabulous treasures, pour a lot of small coins into the box.
How to make a corrugated paper cake?

To make such a paper cake, you need to take the following materials:
- Decorative ornaments
- Sharp scissors
- Styrofoam
- Thread
- Compass
- The needle is large
- Corrugated paper
- Double sided tape
- Brush
- Satin ribbon (must match the paper)
Instructions:
- We take polystyrene, and a circle of a preselected diameter is drawn on it. Then a figure is cut along the contour with a sharp knife. In the event that thin material will be used, then several parts are cut out, which are fastened together.
- You can replace the foam with a paper base, inside which the gift is placed.
- We take a blank and outline its outline on paper, cut out a circle of the required diameter.
- The resulting circle must be glued to the top of the cake.
- Cut out long enough strips from corrugated paper. The height of each strip should be 4mm higher than the cake blank.
- Fold the strip, unfold it further. Then, along the resulting line, it is stitched with a basting seam. The thread is pulled together and the paper is slightly gathered, then we fix it.
- According to this scheme, we make several strips and overlap the entire side surface of the cake with them.
- Scotch tape is attached below and above, and frills are attached to it.
- The threads and all the seams are masked with a satin ribbon, and on top we decorate the cake with a candle or other decorative elements.

To decorate a paper cake with a candle, you need to take the following materials:
- Scotch
- Crepe paper
- White twine
- Paper glue
- White straws - 3 pcs.
Instructions:
- First, we take the straws and carefully cut them off.
- The straws are folded, a not very long piece of string is stretched between them. Then we fix everything together with scotch tape.
- A yellow crepe paper is taken, a fringe is made. Then it is carefully twisted around the straws, attached with a small piece of tape.
- Tubes are taken and wrapped in a blue fringed strip. If necessary, fix it with tape.
- We take an awl, and a small hole is made in the cake, we pull one end of the twine into it, then we fix the candle.


A paper cake is not only a festive symbol. Such a craft can be an excellent original packaging for a gift, scrapbook and postcard with wishes or a small present. The birthday boy will definitely appreciate such a surprise, and your holiday will definitely succeed!
Sometimes you really want to surprise your friends or family and please them with something unusual on a significant day. Moreover, gifts made from the heart and with their own hands are always appreciated and accepted with gratitude and delight. One of these interesting surprises is the cake. What's so unusual, you ask. And the fact that a homemade cake will be completely inedible, but with a lot of kind congratulations and pleasant little things. Do-it-yourself cardboard cake with wishes is a great gift for any occasion, both for adults and children.

Each piece of cake contains an original congratulation and a small surprise that will definitely cheer up its owner, because human psychology is designed in such a way that opening gifts and receiving surprises is a guaranteed surge of happiness hormones. And such a cake will certainly appeal to those who do not eat sweets or keep fit.
This DIY cake is perfect for theme parties or children's parties. It is enough to count the number of guests, make the required number of pieces, put in each wish with a surprise and conduct a kind of lottery or fortune-telling - what wish will come true for the one who pulled out this or that piece. Without a doubt, there will be no limit to the joy of such an event!
In this article, we will learn how to make a cardboard cake with your own hands, what tools and materials will come in handy, and what wishes and gifts you can leave as a surprise.
Cardboard sweets
So, for work you will need: thin cardboard, scissors, glue, a ruler and a pencil, for decoration - colored paper, ribbons, beads and everything that your fantasy tells you.
The cake maker begins by creating a drawing of each piece.
You can use a ready-made cardboard cake template with dimensions, for example, this:
Or print a template like this on paper:

We transfer the stencil to cardboard or draw the part ourselves, and then cut it along the contour.

For convenience, you can immediately use colored cardboard - you will need 13 sheets of different colors. Now in stationery stores you can find material not only of various bright colors, but also textured, iridescent, holographic and other types of cardboard. This will make the cake look very impressive.
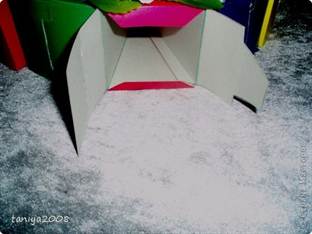
Bend the blank to the inside of the cardboard along the dotted lines.

We glue the edges and make a small cut according to the following scheme.

We leave the wide side of the piece open in order to fill it with wishes and surprises.
And now the fun part - we fill the contents of the cake. We put a note with a wish in each piece. You can limit yourself to only congratulations, but the biggest delight will be caused by small surprise gifts that correspond to every wish.


We close the pieces of the cake using the cut in the part as a lock. And then we decorate the cake with ribbons or beads.


Jewelry options can be very different. Below are a few photos with cake decorating ideas:


Polymer clay or plasticine are also great for creating the effect of real cream or cream on the cake, or for placing and fixing small candles. But you need to be careful when using real candles and observe fire safety rules.
By the way, pieces of cake can be made in the form of triangular boxes with a lid, for example, these:

The options for wishes can be very diverse, ranging from standard to the most personal and special. Let's give an example of some congratulations and good parting words:
- "Sweet life" and put a chocolate bar or candy.
- "Vivid impressions" - colored pencils, crayons or multi-colored sweets will do.
- "Great luck" - symbolizes the dice or lottery ticket.
- "Innumerable wealth" - of course, money or coins.
- "Have a good rest" - a shell or a magnet.
- "Good health" - vitamins, ascorbic acid or hematogen are suitable.
- "Unlimited love" - a small heart.
- "Home warmth" - you can put a candle.
- "Family additions" - a little doll or nipple.
- "Pep" - coffee beans in a beautiful package are perfect.
And you can think of many more different surprises and gifts for any holiday.
Related videos
More interesting ideas for making and decorating a cake made of cardboard with wishes can be seen in the following videos.
I made two such cakes, one as an Advent calendar for children.
The second is for a wedding for our friends.

And now the MK itself:
MK: CAKE SURPRISE WITH WISHES
Such a cake can be presented for the New Year. It can be made from 6, 10 or 12 pieces. If the company is large, then the cake can be made multi-tiered.
In this master class we will have a cake of 12 parts, if you need to make it into 6 or 10 parts, just change the angle in the pattern.
You can also make such a cake for your birthday or as a wedding gift.
We need:
- cardboard, you can use paper for watercolor, you can make it from paper for printing, but then it will not be durable
- scissors
- glue
- a tool for folding cardboard (you can use any rigid stick
- ribbons and other decorative elements
1. Make a pattern according to the attached template
2. Cut, fold and glue the boxes. In order to bend the cardboard, run a stiff stick along the fold line along the ruler. You can use a glue stick for gluing.
3. Turn on your imagination and decorate the cake pieces of your choice. In this case, two types of decor pieces were made, which alternate in the cake.
4. Make a pallet. To do this, you need to cut out a circle of thick paper (Whatman paper) of a suitable diameter. We cut the strip for the sides, retreat from one edge by 1 cm (the height of the side), make cuts to stick to the base.
5. Put a surprise with wishes in each box.
sweet life (candy)
energy (batteries)
bright impressions (colored pencils)
love (heart)
good health (vitamins)
heat (a piece of fur)
light (flashlight)
cheerfulness (coffee beans)
6. Pack the cake in transparent paper.
Now about how I did it
For the first cake, I drew a pattern of a box with a pencil and a ruler on each sheet. And then she cut it out with scissors. Along the fold lines with the same scissors, I first held (not the cutting side), and then bent. For my cakes, I used watercolor paper. There is quite a good cardboard, white on both sides.

For the second cake, I was already too lazy to draw by hand and I decided to try passing the watercolor paper through our printer. He coped with the task quite well. It turned out many times faster.


For the feather cake, I made two tiers of 12 pieces and another tier of 6 pieces with lids. There the pattern was different. I drew it myself, drew it on a ruler, measuring out the required dimensions.


 I made the caps from colored cardboard, passing the edge through a special cutter.


Well, I made the last box round. It looks like now I can make any box))))


For the decor, I used ribbons and a cutter with a flower. A 12-piece cake takes about 7 meters of ribbon to glue each piece in a circle 


I put this cake on the top shelf and gave a piece to Andryusha every day.


There was a letter for learning the alphabet. A toy wrapped in foil and a piece of cotton for the beard of our Santa Claus. Every day we glued a piece of cotton wool on Santa Claus's beards.

And now about the cake for the wedding.
12 boxes were made in the same way as in the first cake. But then I decided to make a stand. My cake just fits into one of the lids. So I chose a thicker cardboard, put this cover around it with a pencil, and then cut it out with a knife.


Then I cut strips from A4 paper for watercolor. bent in two for greater density. 
Glued them together in one long strip

And then she glued it to her circle. I cut off the excess. I pasted a pencil on the glue. He fit best. I glued the pieces themselves together.

In a circle she pasted over with another ribbon.

In the middle, I handed over the hole and rolled the paper into a tube and inserted it into that hole. I glued the same to the base. To make a flower in the middle that would not fall when pulling out the pieces.


Wrapped outside with transparent paper and tied a bow 
Now for the surprises for this cake.

Small souvenirs and wishes for them.
1. Big and pure love
Love is a wonderful gift from fate ...
Dreams come true with her!
Always keep it in your hearts!
Live in love and joy!
(keychain with a heart)
2. To the car
So that they do not stand still,
What would they drive to visit us,
I wish I could buy you a car
The first installment is just for the bus.
(money machine)
3. Unforgettable travel
So that they have a rest at the sea,
And they flew to Paris more than once.
(shell)
4. For kids
That would be a lasting union,
We urgently need a toddler!
Have a baby
And girls and guys!
(pacifier)
5. Home warmth
Song your home will be filled with comfort,
Every minute will be bright!
(candle)
6. Good health
(ascorbic acid)
7. Sweet moments
(rafaelo)
8. Have a good mood
(smiley)
9. Ruble for a rainy day
We know the amount is not large,
But congratulating you on your Wedding Day,
I would like to tell you:
Know if the day is hard
In addition to this ruble
She will always support you in everything
Our friendly family!
(ruble)
10. On a romantic hike
in the movie theaters
(money)
11. Inexhaustible energy
We wish this holiday
You energy and strength,
That would be every day with dawn
Only brought joy!
(botareki)
12. Money
Let the money, huddled in a flock of birds,
They fly towards you like a hurricane!
Let them surround, attack
And they climb with impudence into their pockets!
(money)
The article will tell you how to make an original surprise cake.
A surprise cake is an unusual gift that will delight the birthday boy and surprise all guests. It is quite simple to make it, especially if you know the secrets of making it. But how to decorate, you need to come up with yourself. After all, such a gift is room for creativity and the manifestation of your individuality.
How to make a cake from paper or cardboard with wishes?
From the materials we need:
- Thick cardboard (colored, with pictures or white)
- Cake slice stencil template
- Scissors
- Decorative items (e.g. ribbons, artificial flowers, beads, lace)
- Papers with wishes
- Small gifts that you will put inside
Making a paper cake:
- We print on plain paper a stencil for future pieces of cake
- We take a sheet of cardboard, redraw a stencil on it and cut it out
- Bend the cardboard carefully along the dotted lines
- Fold a piece of paper cake
- We do this with each sheet of cardboard. There should be so many pieces to form a round cake.
- Now we make the base. We put all the pieces in a circle, measure the diameter of the circle
- Cutting a circle of the required diameter from cardboard
- We make boards from cardboard or paper
- The base will help you easily carry the cake during transport
- We put in each piece a surprise gift and a wish written or printed on a piece of paper
- Now let's do the decor
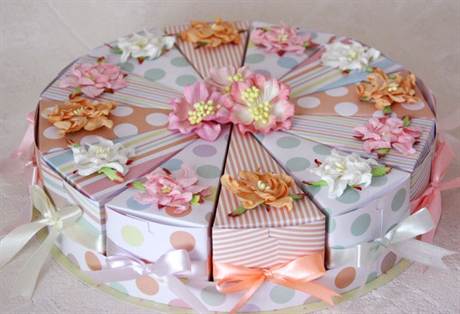
- One decor idea is to wrap each piece of cake with ribbon. Make a small bow at the back of the piece. On top, make a sticker where the birthday of the birthday person will be indicated. Decorate with flowers, beads or ribbon
- Wrap the finished cake in wrapping cellophane, tie a bow


Cake Decorating with Wishes
- Decorating a birthday cake will be appropriate with flowers
- If you are lazy, or do not have enough time to decorate each piece of cake, you can make a composition and decorate its center
- The base of the cake is optional. You can just put all the pieces tightly to each other, fix them with small pieces of double-sided tape and wrap the cake with tape
- Pieces for such a cake, so that they do not merge, it is better to make different colors
- Place a flower arrangement on top of the cake. Flowers can be made from paper using a simple workshop

Spiral flowers
- Cutting a circle out of cardboard
- We draw a spiral on it, like a snail. Making edges not too thin
- Now we twist our spiral. You will get an original rose
- The ends of the rose, so that it does not disintegrate, we fix with glue or tape

Wishes cake schemes and template
- The template to be printed and cut out. Don't forget to outline the fold lines.

Template - the basis
- A template that shows where to apply the glue when making a piece of cake

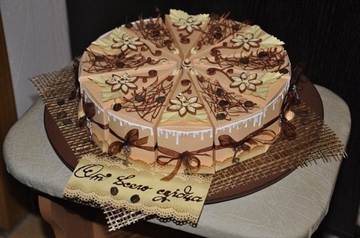
Birthday wishes cake: photo
Wish cake ideas:


What to put inside a paper cake? Cake with surprise and wishes
Inside each piece of cake we put a wish and a small surprise that symbolizes this wish. An example would be such a "filling":
- "Optimism for life." Put a smiley icon, balls or soap bubbles inside
- "Prosperity". You can put a banknote. By the way, this is a great idea to present money in an original way.
- "Love". We put a small heart
- "Sweet life". You can put candy or your favorite birthday bar
- "Good luck and luck." Place the dice, card or poker chip
- "Health". You can put Hematogen or Ascorbic acid
- "Warmth and love of loved ones." For this wish, a candle or a small soft toy is suitable.
- “Replenishment in the Family”. Baby doll or pacifier
- "More travel." Airplane toy, shells or ticket
- "Pleasant surprises from life." Kinder Surprise
- "New purchases". Here you can invest what the birthday person dreams of (for example, a car model)

"Filling" for a cake with a surprise
Video: How to make a cake with a surprise and a wish
Sometimes you want the gift to be not only beautiful, but also original. Try making a paper cake with your own hands. This cake is perfect for any event - a birthday of a friend or loved one, Valentine's Day, a wedding or March 8th. The cake consists of pieces of bonbonnieres filled with surprises or sweets.
Such a cake is not a very difficult craft, so anyone can master it. The main thing is more desire, creativity and accuracy.
To make a cake, you need a little imagination, paper or cardboard, scissors, glue and various elements for decoration.
Tips for making a DIY paper cake:
Try to choose colors that are compatible with each other.
Children's drawings or bright colors are more suitable for a child.
Take your time to save time. A paper cake requires painstaking work. But the result will make itself felt - its owner will not dare to throw away such beauty for a long time!
To prevent each piece of the cake from falling apart, tie each piece with a satin ribbon. This will add originality and completeness to the cake.
When decorating each bonbonniere, do not forget that the cake must open.
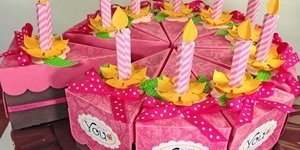
Where to begin? Probably from a template that needs to be printed on a printer. Our cake requires 12 sheets of paper on which we have printed the template. This is more convenient than transferring each part to paper, trying to match the template. 
Cut out the template. To make the cake beautiful, we glued holographic paper triangles to the size of the cake on the top of it. You can also add extra stripes along the sides for decoration. We do all this before you need to glue the cake (this is more convenient).
Next, bend the paper at the folds and glue it using glue stick. It leaves no residue and dries quickly. 

We fill each piece with a gift and close it.
What can you fill each piece of cake with?
Sweets with a wish for a sweet life.
A small car with a desire to buy a new foreign car or a luxurious life.
A shell for a long-awaited journey.
Coffee (sticker) for pep.
Heart with a wish to find great love.
A smiley is always a good mood.
Colored pencils - more joys of life, events filled with bright colors.
Dice - good luck, luck.
Vitamin - good health.
Money - financial well-being.
A candle - family warmth and comfort.
The battery is of inexhaustible energy.
After all the pieces are ready, decorate the cake with a glue gun. We fasten all parts with a red satin ribbon.
Here's the cake we got: 